Hello!
Today, we will create a small mobile application, which requires user authentication, using .NET MAUI.
I hope you already have a valid environment. Read this article on how to set up .NET MAUI.
If you don't have an Azure Active Directory, watch this video on how to set it up:
And Azure Active Directory (B2C):
So let's start!
- Create a new .NET MAUI project.
- Install
Microsoft.Identity.Client
package:
If the library doesn't work on iOS/MacCatalyst, you can still use .NET MAUI WebAuthenticator.
- Create
Constants
class:
public static class Constants
{
public static readonly string ClientId = "Your client id guid";
public static readonly string[] Scopes = new string[] { "openid", "offline_access" };
/* Uncomment the next code to add B2C
public static readonly string TenantName = "YOUR_TENANT_NAME";
public static readonly string TenantId = $"{TenantName}.onmicrosoft.com";
public static readonly string SignInPolicy = "B2C_1_client";
public static readonly string AuthorityBase = $"https://{TenantName}.b2clogin.com/tfp/{TenantId}/";
public static readonly string AuthoritySignIn = $"{AuthorityBase}{SignInPolicy}";
*/
}
- Then modify manifest files.
For Android open
AndroidManifest.xml
and add the next activity to the application:
<application android:allowBackup="true" android:icon="@mipmap/appicon" android:roundIcon="@mipmap/appicon_round">
<activity android:name="microsoft.identity.client.BrowserTabActivity" android:exported="true">
<intent-filter>
<action android:name="android.intent.action.VIEW" />
<category android:name="android.intent.category.DEFAULT" />
<category android:name="android.intent.category.BROWSABLE" />
<data android:scheme="msalYOUR_CLIENT_ID_HERE" android:host="auth" />
</intent-filter>
</activity>
</application>
<queries>
<package android:name="com.azure.authenticator" />
<package android:name="YOUR_APP_IDENTIFIER" />
<package android:name="com.microsoft.windowsintune.companyportal" />
<!-- Required for API Level 30 to make sure we can detect browsers
(that don't support custom tabs) -->
<intent>
<action android:name="android.intent.action.VIEW" />
<category android:name="android.intent.category.BROWSABLE" />
<data android:scheme="https" />
</intent>
<!-- Required for API Level 30 to make sure we can detect browsers that support custom tabs -->
<!-- https://developers.google.com/web/updates/2020/07/custom-tabs-android-11#detecting_browsers_that_support_custom_tabs -->
<intent>
<action android:name="android.support.customtabs.action.CustomTabsService" />
</intent>
</queries>
Pay attention that data android:scheme
starts with msal
.
For iOS add the following code to the Info.plist
:
<key>CFBundleURLTypes</key>
<array>
<dict>
<key>CFBundleTypeRole</key>
<string>Editor</string>
<key>CFBundleURLName</key>
<string>YOUR_APP_IDENTIFIER</string>
<key>CFBundleURLSchemes</key>
<array>
<string>msalYOUR_CLIENT_ID_HERE</string>
</array>
</dict>
</array>
<key>LSApplicationQueriesSchemes</key>
<array>
<string>msauthv2</string>
<string>msauthv3</string>
</array>
It allows the app to correctly work with Microsoft Authenticator
if a user has MFA enabled.
- We need to override some methods to receive a callback from the identity server.
For Android open Android/MainActivity.cs
and override OnActivityResult
method:
protected override void OnActivityResult(int requestCode, Result resultCode, Intent? data)
{
base.OnActivityResult(requestCode, resultCode, data);
AuthenticationContinuationHelper.SetAuthenticationContinuationEventArgs(requestCode, resultCode, data);
}
You also need to set the activity attribute Exported = true
.
For iOS open iOS/AppDelegate.cs
and override OpenUrl
method:
public override bool OpenUrl(UIApplication app, NSUrl url, NSDictionary options)
{
AuthenticationContinuationHelper.SetAuthenticationContinuationEventArgs(url);
return base.OpenUrl(app, url, options);
}
- It's time to create our
AuthService
:
public class AuthService
{
private readonly IPublicClientApplication authenticationClient;
public AuthService()
{
authenticationClient = PublicClientApplicationBuilder.Create(Constants.ClientId)
//.WithB2CAuthority(Constants.AuthoritySignIn) // uncomment to support B2C
#if WINDOWS
.WithRedirectUri("http://localhost")
#else
.WithRedirectUri($"msal{Constants.ClientId}://auth")
#endif
.Build();
}
public async Task<AuthenticationResult> LoginAsync(CancellationToken cancellationToken)
{
AuthenticationResult result;
try
{
result = await authenticationClient
.AcquireTokenInteractive(Constants.Scopes)
.WithPrompt(Prompt.ForceLogin)
#if ANDROID
.WithParentActivityOrWindow(Microsoft.Maui.ApplicationModel.Platform.CurrentActivity)
#endif
#if WINDOWS
.WithUseEmbeddedWebView(false)
#endif
.ExecuteAsync(cancellationToken);
return result;
}
catch (MsalClientException)
{
return null;
}
}
}
- Now we can prepare the UI to use our AuthService. Add login button to your XAML and add Clicked event handler:
var authService = new AuthService(); // most likely you will inject it in the constructor, but for simplicity let's initialize it here
var result = await authService.LoginAsync(CancellationToken.None);
var claims = result?.ClaimsPrincipal.Claims; // you can also get AccessToken or IdToken from result if you need it
if (claims != null)
{
var stringBuilder = new StringBuilder();
stringBuilder.AppendLine($"Name: {claims.FirstOrDefault(x => x.Type.Equals("name"))?.Value}");
stringBuilder.AppendLine($"Email: {claims.FirstOrDefault(x => x.Type.Equals("preferred_username"))?.Value}");
LoginResultLabel.Text = stringBuilder.ToString();
}
We are done. Start the application and check the result.
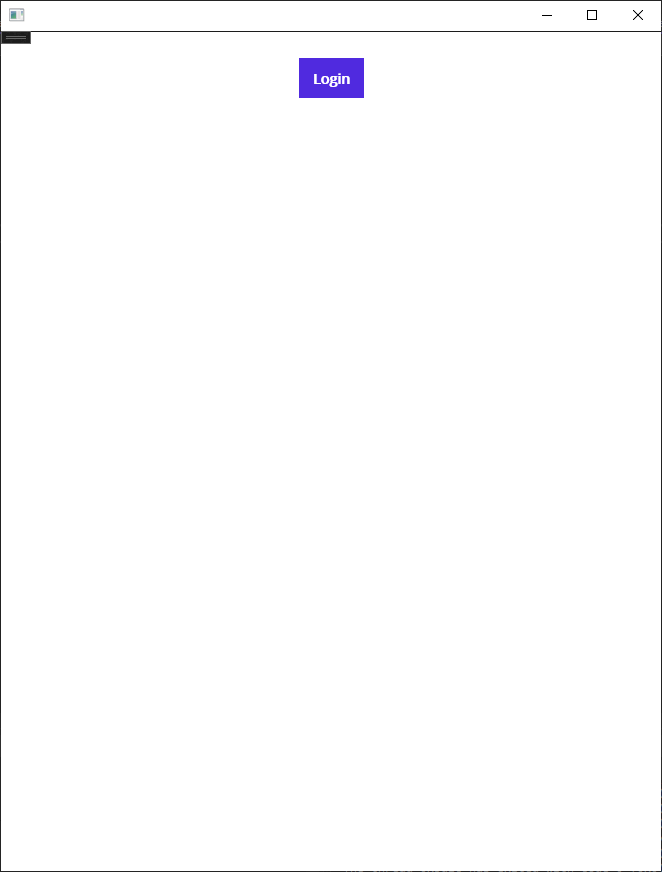
The full code can be found on GitHub.
MauiAuth Blazor sample GitHub.